Build a Modular LEGO® High Rise Storage System
A Fun LEGO® Storage Idea
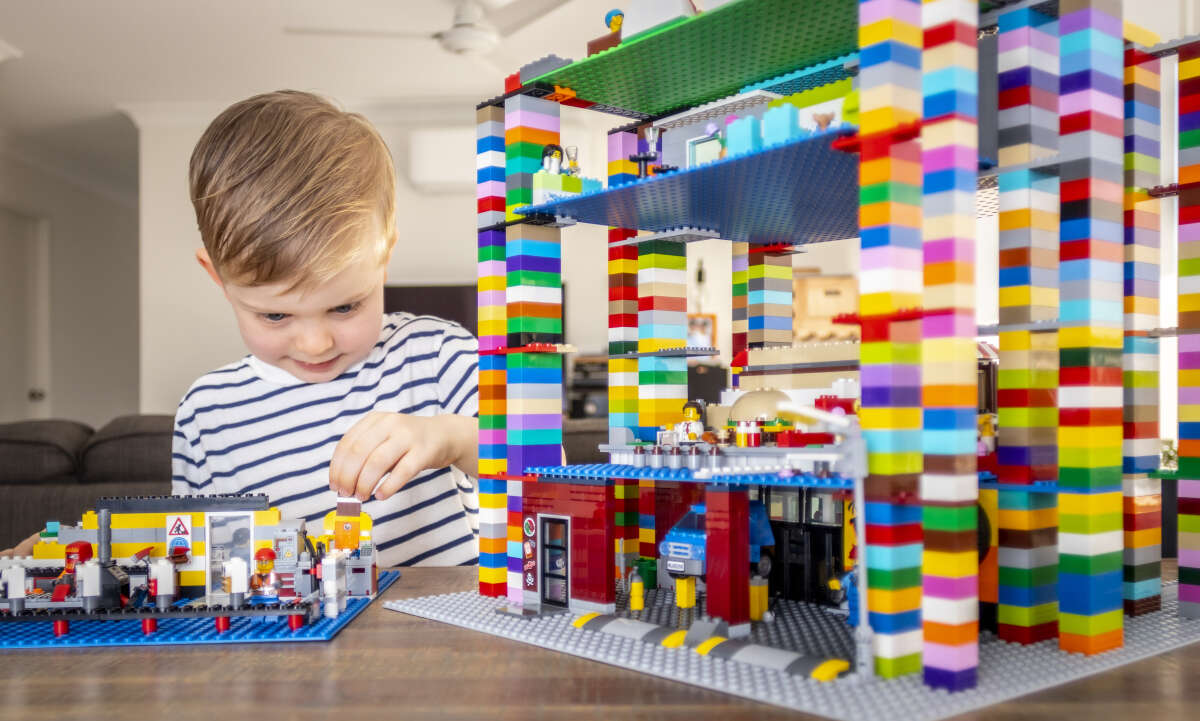
We called this our Lego® High Rise Storage System; it is a way to store and easily access scenes that you have built on baseplates. Each scene is built on a 32x32 stud baseplate and they can slide in and out of the high rise structure.
Whilst we tried to create scenes to match a typical high rise building, you could use this high rise as a storage system for any scenes that you have built. It allows us to have a set of scenes always set up that we can access any time.
In this post, we explain how we built our LEGO® High Rise Storage System and show you plenty of photos.

The All-Important Baseplates
The key to this storage high rise is the Lego® Baseplate. The official 32x32 stud baseplates do NOT have a clickable bottom side. As pictured below, you can see that the 32x32 white baseplate has small holes, and other bricks can not click into these holes. Compare that to the smaller green baseplate where you can click bricks to the underside.
Having a smooth underside allows the baseplate to slide over other lego, and not get stuck trying to seat itself. This feature enables you to slide each baseplate in and out of the high rise structure easily.

Building The Outer Structure
Overview
We built the high rise on a 48x48 stud grey baseplate. The overall baseplate has to be larger than the 32x32 baseplate that we use for each level.
The finished size of this building is up to you. You can decide how many levels you want, and you can decide the space in between each level.
We chose to have 5 levels, including the ground level, and 8 standard blocks in between each level.
Main Uprights
As pictured below, we have 6 main uprights, three on each side. The higher you go, the wider the uprights need to be. You can see on our picture that each of our uprights are actually 2 sets of blocks. This reduces sideways movement.
You need to leave exactly 32 studs in between the left and right uprights, and the distance between the front of the first upright, and the back of the last upright is also 32 studs. This will ensure the inserted baseplates will be flush with the front and back as well as each side.

Tabs For Each Level
While building your uprights, you will need to insert a tab for each level above ground. This is where you will slide the baseplates in and out. We used a thin block and overhung it buy 2 studs. See the image below.

Top Cross Support
Once our uprights were complete, we decided to place a support across the top that would sit directly under the top-level baseplate. This reduced sideways movement and ensured the uprights were not spread apart when sliding the bases in and out.

Insert The Baseplates
Once your uprights are built and the cross piece in place, you can insert your baseplates. They will slide in and out from the front or back.


Creating Scenes For Each Level
Now that you have your high rise built, you can get to the fun! Creating scenes for each level. This is totally up to you, and you can change the scenes as often as you like. But there is something important to keep in mind...
Baseplates are thin and will bow down when they are only supported by tabs on the edges. You need to combat this by making sure each scene has something that makes it thicker all the way across. We decided to split each level into 2 sections (Front & back), divided by a wall. This allowed us to have more scenes and provided us with the support to stop bowing.
Pictured below is our Robot scene. We had a workshop on one side, and a retail store on the other. The wall dividing them went all the way across and stoped it bowing. Just make sure the wall is not too high and doesn't hit the level above when you insert it into the high rise.

Creating the Bottom Scene
On our high rise, I built the bottom scene directly onto the larger base plate. You can do this, and it works fine, however; Time over, I would have treated the bottom like any other level and made it removable. If my son wants to play with the bottom level how it is, I have to bring the whole structure out. Would have been nice to have it on a baseplate too.

All Completed
That's it; your high rise is built. Now you can save space, and have easy access to your favourite scenes. I have this on a shelf in my office, and whenever my son wants a scene, I just slide it out. We can easily change them too.
Important Tips
Here is a list of tips that we think you should keep in mind:
Lots of LEGO®: You are going to need a lot of LEGO®, don't leave yourself short.
Test as You Go: Don't get to the very top and realise you left a 31 stud gap and not 32.
Reduce Sideways Movement: Make the uprights wide to limit sideways movement.
Choose Baseplates Carefully: I am not sponsored by LEGO®, and don't really care what brand blocks people use, but, the official baseplates have a somewhat smooth bottom that allows them to slide. If you don't use the official brand, check your baseplates can also do this.
Stop Baseplates Bowing: As mentioned above, ensure you build something across your baseplate because they tend to bow.

LEGO® is a trademark of the LEGO Group of companies which do not sponsor, authorize or endorse this site.
Read Next

Review: Classic Geomag System
The Geomag Classic system is an awesome STEM teaching toy. Here is our review of the Geomag Classic System.

